3 Approaches for Implementing Nested Forms in Angular
I’ve seen a few different solutions for implementing nested forms in Angular, and wanted to go over 3 of them in this post. I work mostly with Reactive Forms approach, and will be focusing on that. For the code example, I am taking the code sample from the Angular documentation on Reactive Forms as a starting point. The code builds a group of form controls, which allows a user to enter name and address and shows the form value and validity status. I’ve added 2 constraints:
- We need to extract code/markup for Address into it’s own component, so that it can potentially be reused.
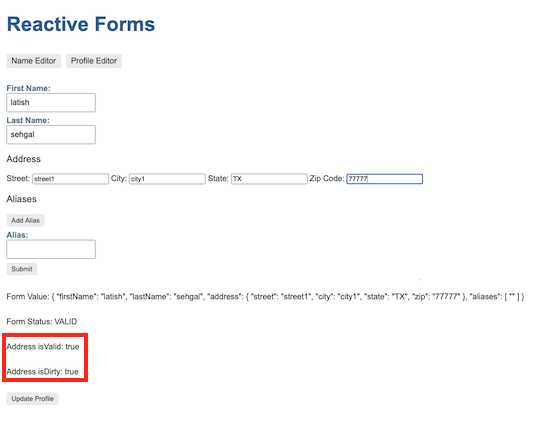
- We need to track/display the validity as well as dirty status (highlighted in red in screenshot below) of the Address component (Street field in Address is now a required field in this sample.). I’ve run into this requirement many times, where these states drive/enable other UI components in a form.
Approach 1: Pass FormGroup reference to child components using @Input
This is the most common approach that I’ve seen being used. We start by creating a new component for Address.
ng g c addressWe move over the html and typescript code for rendering Address into its component. Since we need access to the root FormGroup, we pass it via an @Input. In the ngOnInit() method for the Address component, we can add the Address controls to the parent formgroup.
To read the dirty/valid status of the Address component in the parent control, we can try and get the child control via something like profileForm.get('address') and then read the corresponding properties. But this goes against the principle of encapsulation, as we’ll be relying on knowing the internal implementation of a Component. A better way would be to expose the needed properties on the Address component and accessing them from the parent, so I’ve added isValid and isDirty getter properties. You can review the code/demo below.
Pros:
- Easy to implement and understand.
Cons:
- Need to create an additional @Input on the Component to pass FormGroup.
- Need to add additional properties for tracking validity and dirty state of the component.
Approach 2: Injecting ControlContainer
From the documentation on ControlContainer, it is:
A base class for directives that contain multiple registered instances of NgControl. Only used by the forms module.
This approach is similar to the previous one, but instead of passing the parent FormGroup via an @Input, we inject the ControlContainer class into the constructor of our Address component. This gives us access to the parent FormGroupDirective and lets us get to the corresponding control. Other than that, the solution is pretty similar to Approach 1 above, and you still have to create additional properties on the Address component to track the dirty/valid status.
Pros:
- No need to create an additional @Input for passing FormGroup.
Cons:
- Still need to add additional properties for tracking validity and dirty state of the component.
To learn more about using this approach, you can watch Jennifer Wadella’s talk from ng-conf.
Approach 3: Implement ControlValueAccessor
From the documentation, ControlValueAccessor
Defines an interface that acts as a bridge between the Angular forms API and a native element in the DOM.
To be more closely aligned with Angular Forms, we’re going to implement the ControlValueAccessor interface on our Address Component. This means we’re going to implement the following 4 methods.
interface ControlValueAccessor {
  writeValue(obj: any): void
  registerOnChange(fn: any): void
  registerOnTouched(fn: any): void
  setDisabledState(isDisabled: boolean)?: void
}
Let’s look at each of these:
writeValue()is called by the forms API to write to the view when programmatic changes from model to view are requested. We can do this by using the setValue() (or patchValue(), depending on the data you’re getting) method in the forms API.registerOnChange()registers a callback function that is called when the control’s value changes in the UI. With forms API, we can find out when the control value changes by subscribing to valueChanges observable on our component’s FormGroup.registerOnTouched()registers a callback function that is called by the forms API on initialization to update the form model on blur. We don’t care about the touched status in this sample, so we can leave it blank.setDisabledState()is called by the forms API when the control status changes to or from ‘DISABLED’. We can enable/disable our FormGroup as needed.
After implementing ControlValueAccessor interface methods, we need to register a NG_VALUE_ACCESSOR provider.
providers: [
{
    provide: NG_VALUE_ACCESSOR,
    useExisting: forwardRef(() => AddressComponent),
    multi: true
},
...
]
If you want to learn more about ControlValueAccessor, this post explains it in depth.
Now we still need to expose the validity status of the component. To do so, we need to implement the Validator interface, and then register it a NG_VALIDATORS provider, like we did for NG_VALUE_ACCESSOR. I learned about this approach from this post. Since our Address component is behaving like an Angular Forms Control, we can read the valid and dirty status in the parent html just like how we do it with Angular Forms (profileForm.get('address').valid and profileForm.get('address').dirty)
The final source code and demo is below:
**Pros:**- The solution has better encapsulation. It feels like it’s worth the effort for longer complex projects.
Cons:
- There’s a lot more boilerplate code to write.
Kara Erickson covered ControlValueAccessor in her Angular Forms talk at Angular Connect (Nested forms starts at 25:23).
Conclusion
We looked at 3 different alternatives for implementing Nested Forms in Angular in this post. They might all be good solutions, depending on your requirements, but it might not be a bad idea for you and your team to be on the same page regarding your available options, and preferred solutions, on a project.
The code for all the 3 approaches can be seen in the github repo. There’s a branch corresponding to each approach.